Creating public synonym for a single table is easy in oracle but at times we might need to create public synonym for all the tables under a schema. In
Peoplesoft, we might use it for below purpose:
a. To help other Database users to directly access SYSADM tables without prefixing owner name eg. sysadm.PSOPRDEFN.
b. To create 2nd access id and granting rights on tables of primary access id.
1. Generating Script for Creating Public synonyms
Open the SQL Tool and run the following commands.
SQL> Spool synonyms.sql;
SQL> select 'create public synonym ' ||table_name|| ' for ' ||owner||'.'||table_name ||';' from dba_tables where owner='SYSADM';
SQL> spool off;
Open synonyms.sql in a text editor.
This file would contain the sql to create public synonym for all the tables in SYSADM schema.There would be multiple entries as shown below
'CREATEPUBLICSYNONYM'||TABLE_NAME||'FOR'||OWNER||'.'||TABLE_NAME||';' .
These entries can be simple replaced with blank space.
We are left with script that be executed to create public synonym of all SYSADM'S table.
2. Granting rights on these public synonyms to another userid.
SQL> Spool grantsyn.sql;
SQL> select 'grant select on ' ||table_name|| ' to sysadm2 ;' from dba_tables where owner='SYSADM';
SQL> spool off;
OR
SQL> Spool grantsyn.sql;
SQL> select 'grant select on ' ||synonym_name|| ' to sysadm2;' from dba_synonyms where owner='SYSADM';
SQL> spool off;
3. Run synonyms.sql
4. Run grantsyn.sql
Pleased to announce that we have moved to a new PeopleSoft blog http://peoplesofttutorial.com/ . You will find lots of articles about PT8.53, IB, PeopleSoft basics and administration tasks, Oracle tips.
Wednesday, 21 April 2010
Tuesday, 13 April 2010
Using Putty with XManager
1.Installing and Starting Xmanager
Download the Xmanager and install the software on windows machine where graphical display is required. After installation is complete, go to Start > Programs > Xmanager3 > Xmanager – Passive
This will start the Xmanager is passive mode and xmanager will run in background.
2.Configuring Putty
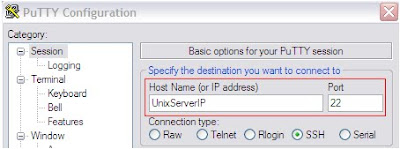
Go to Session and enter the hostname of the server. Make sure SSH is chosen as Connection Type.


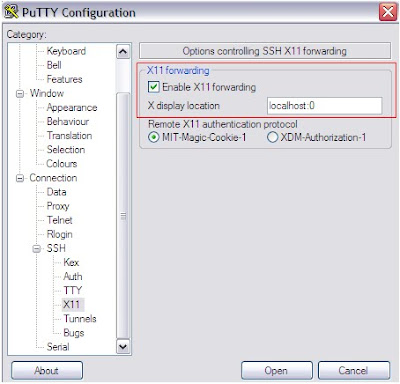
Go to SSH – X11 and Enable X11 forwarding. In X display location,enter localhost:0. Hit Open.
3. Using putty for graphical display
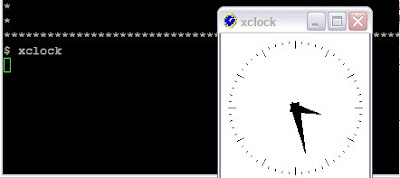
Login into the server and start xclock. Output will be a graphical clock displayed on the local windows machine.

This completes the configuration of Putty for graphical display with Xmanager.
Download the Xmanager and install the software on windows machine where graphical display is required. After installation is complete, go to Start > Programs > Xmanager3 > Xmanager – Passive
This will start the Xmanager is passive mode and xmanager will run in background.
2.Configuring Putty
Go to Session and enter the hostname of the server. Make sure SSH is chosen as Connection Type.


Go to SSH – X11 and Enable X11 forwarding. In X display location,enter localhost:0. Hit Open.
3. Using putty for graphical display
Login into the server and start xclock. Output will be a graphical clock displayed on the local windows machine.

This completes the configuration of Putty for graphical display with Xmanager.
Monday, 5 April 2010
How to find number, and user for failed login attepts in PeopleSoft
In log file APPSRV_MMDD.LOG (located in <PS_HOME>/appserv/<DOMAIN_NAME>/logs, note each successful or failed login attempt.
See example below:
PSAPPSRV.3644 (21) [03/26/08 09:43:38 GetCertificate](3) PeopleSoft ID and Password authentication failed. Invalid password for user VP1@kdriver-us.us.oracle.com.
PSAPPSRV.3644 (21) [03/26/08 09:43:38 GetCertificate](1) (NET.502): VP1@kdriver-us.us.oracle.com is an Invalid User ID, or typed the wrong password. User ID and Password are required and case-sensitive. Make sure typing in the correct upper and lower case.
Subscribe to:
Comments (Atom)